MyInvois Extension for Manager.io

Hello everyone,

I am pleased to announce the release of the MyInvois Extension for Manager.io. :tada:
This extension is now available for testing and feedback.

What is MyInvois Extension?

The MyInvois Extension is an add-on for Manager.io that enables businesses in Malaysia to comply with LHDNM e-Invoicing requirements.
With this extension, you can:

  • Integrate Manager.io with the MyInvois system.
  • Submit Sales Invoices and Credit Notes directly to LHDNM.
  • Track document statuses (Submitted, Valid, Invalid, Cancelled).
  • Perform taxpayer lookups using official LHDNM QR codes.

:warning: Important Notice

  • Ensure credentials match the selected environment (PreProduction or Production).
  • Do not use real business data in PreProduction mode.
  • After successful testing, switch to Production with real data.

How to Use

:one: Registering the Extension

  • Go to Manager → Settings → Extensions.
  • Create a New Extension with the following details:
    • Name: MyInvois-Extension
    • Source: Url
    • Endpoint: https://myinvoisextension.azurewebsites.net
    • Placement: customers, sales-invoice-view, or credit-note-view
  • Since multi-placement is not yet supported, repeat the process for each placement.

:two: Integration Wizard

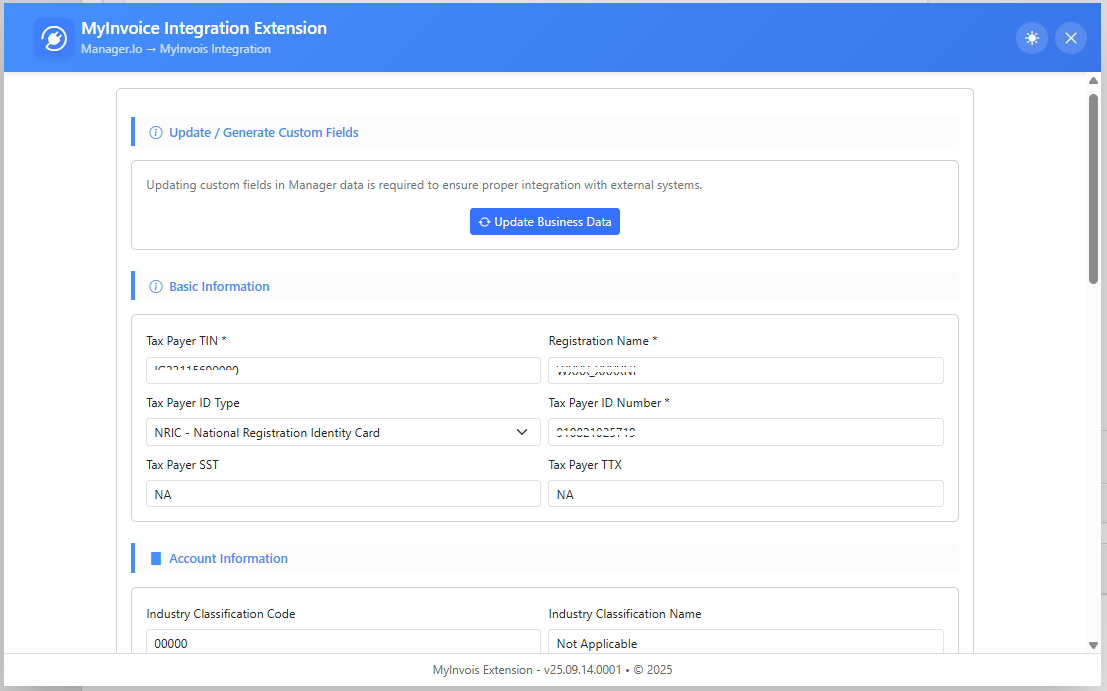
  • Fill in your business details, credentials, and select the environment (PreProduction/Production).
  • Verify credentials with the LHDNM system.
  • Document v1.0 → no certificate required.
  • Document v1.1 → a valid certificate from an LHDNM-recognized provider is required.

:three: Submit Invoice / Credit Note

  • Create a Sales Invoice or Credit Note in Manager.
  • Open the document and click the MyInvois Extension button.
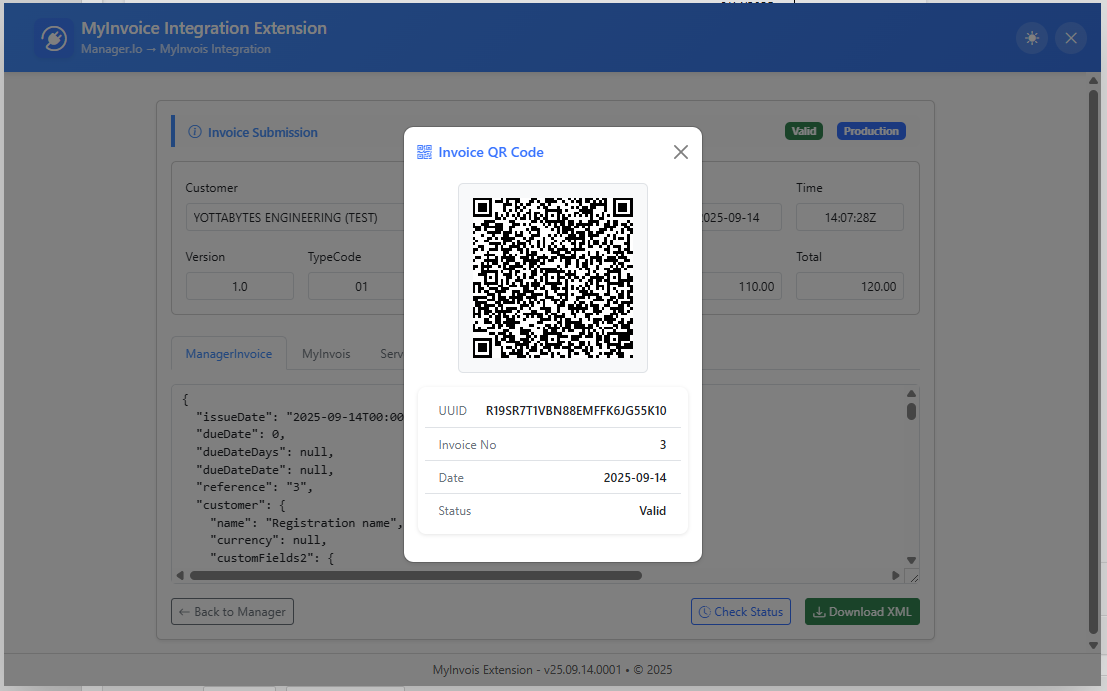
  • The document will be converted into an e-Invoice compliant with LHDNM.
  • Click Submit to send it to LHDNM.
  • The status will be updated in Manager:
    • Success → Submitted
    • Errors → displayed for correction
  • Use Check Status to retrieve the latest status from LHDNM.
  • When the document is Valid or Cancelled, a QR Code will be generated and saved into the Manager document.

:four: Taxpayer Lookup

  • Verify taxpayer details using QR codes. Supported methods:
    • Scan with camera
    • Drag & drop a QR image
    • Upload a QR file from device
    • Manually type QR content
  • Retrieved taxpayer details can be saved as Customer Data in Manager, ensuring consistency with the official LHDNM database.

Feedback

I kindly invite everyone to try out the MyInvois Extension in PreProduction and share your feedback. Please report any issues or bugs you encounter and feel free to suggest ideas for improvements. Your input will help shape the future development of this extension and ensure it becomes more useful for the community.

@wazhanudin, @neobks91, @zmm

8 Likes

Thank you so much for your kind efforts @Mabaega on this project.

I will try out the extension and give the feedback as soon as possible.

:star_struck:

Hi, thank you for your effort in MyInvois integration with Manager.

For the business details that filled in at Integration Wizard, it’s only 1 time update, then next time will skip this stage to submit the MyInvois direct or we have to fill in own business details every time we do submission of an invoice ?

1 Like

Hi, where to find the integration Wizard?

@Amirah_Mahirah_Abdul Welcome to forum, on top :outbox_tray:of this post.

Hi Everyone,

Great to hear Manager can work with e-invoice. Does it also work for Self Billed and Consolidate Invoices?

At the moment, the integration only supports two invoice types:

Code –  Description 
01 – Invoice 
02 – Credit Note

For the invoice type you mentioned, could you please share an example of how you normally create it in Manager? This will help me better understand the differences between that invoice type and a standard invoice or credit note.

1 Like

There is 1 small error during the recurring sales invoice, the Document Issue Date doesn’t appear. Need to reopen a new invoice for it to appear.

1 Like

@neobks91

I have not yet touched the Recurring Sales Invoice section.

Could you try updating the script in the Document Status custom field description?

<div id='MainScriptContainer'>
  <script>
    document.addEventListener('DOMContentLoaded', () => {

      const vModelForm = document.getElementById('v-model-form');
      if (!vModelForm) return;

      const documentIssueDateGuid = '65bf01ec-9d33-45c5-b441-4b29b1bfdfba';

      // ------------------------------------------------------------
      // Find Document Status input
      // ------------------------------------------------------------
      function findDocumentStatusInput() {
        const labels = vModelForm.querySelectorAll('label');
        for (const label of labels) {
          if (label.textContent.trim().toLowerCase() === 'document status') {
            const grp = label.closest('.form-group') || label.parentElement;
            if (!grp) continue;

            const inp = grp.querySelector('input, textarea, select, input[type=hidden]');
            if (inp && inp.value && inp.value.toString().trim() !== '') {
              return inp;
            }
          }
        }
        return null;
      }

      const documentStatusInput = findDocumentStatusInput();
      let documentStatusHasValue = !!documentStatusInput;

      // ------------------------------------------------------------
      // Detect Update Button
      // ------------------------------------------------------------
      const updateButton = document.querySelector('button.btn.btn-success');

      // Jika status ada tapi tidak ada update button → reset
      if (documentStatusHasValue && !updateButton && documentStatusInput) {
        documentStatusInput.value = '';
        documentStatusHasValue = false;
      }

      // ------------------------------------------------------------
      // Lock Date Picker
      // ------------------------------------------------------------
      const dateInput = document.querySelector('.mx-input');
      if (dateInput) {
        dateInput.readOnly = true;
        dateInput.setAttribute('readonly', 'readonly');
        dateInput.style.opacity = '0.8';

        const cal = document.querySelector('.mx-icon-calendar');
        if (cal) {
          cal.style.pointerEvents = 'none';
          cal.style.opacity = '0.5';
        }
      }

      // ------------------------------------------------------------
      // Lock form if DocumentStatus has value
      // ------------------------------------------------------------
      if (documentStatusHasValue) {

        const allowedButtons = [
          ...document.querySelectorAll('button.btn.btn-success, button.btn.btn-primary, button.btn.btn-default')
        ];

        vModelForm.querySelectorAll('input, textarea, select, button').forEach(control => {
          const isCheckbox = control.tagName === 'INPUT' && control.type === 'checkbox';
          const isAllowedButton = allowedButtons.includes(control);

          if (!isCheckbox && !isAllowedButton) {

            if (control.tagName === 'INPUT' || control.tagName === 'TEXTAREA') {
              control.readOnly = true;
              control.setAttribute('readonly', 'readonly');

            } else if (control.tagName === 'SELECT') {
              control.style.pointerEvents = 'none';
              control.style.opacity = '0.6';

            } else if (control.tagName === 'BUTTON') {
              control.style.pointerEvents = 'none';
              control.style.opacity = '0.6';
            }

          } else if (isCheckbox) {
            control.style.pointerEvents = 'none';
            control.style.opacity = '0.8';
          }
        });

        // v-select
        vModelForm.querySelectorAll('.v-select').forEach(vs => {
          vs.style.pointerEvents = 'none';
          vs.style.opacity = '0.6';
          vs.querySelectorAll('input.vs__search, .vs__clear').forEach(el => {
            try {
              el.readOnly = true;
              el.setAttribute('readonly', 'readonly');
              el.style.pointerEvents = 'none';
            } catch (e) {}
          });
        });

        // select2
        vModelForm.querySelectorAll('.select2-container').forEach(s2 => {
          s2.style.pointerEvents = 'none';
          s2.style.opacity = '0.6';
          s2.querySelectorAll('input').forEach(el => {
            try {
              el.readOnly = true;
              el.setAttribute('readonly','readonly');
            } catch(e) {}
          });
        });

        // Remove handle delete
        vModelForm.querySelectorAll('td.handle').forEach(td => {
          td.style.pointerEvents = 'none';
          td.style.opacity = '0.5';
        });

        vModelForm.querySelectorAll('a.btn.btn-danger').forEach(link => {
          link.style.pointerEvents = 'none';
          link.style.opacity = '0.6';
          link.setAttribute('aria-disabled', 'true');
          link.removeAttribute('href');
        });
      }

      // ------------------------------------------------------------
      // Reference checkbox & text
      // ------------------------------------------------------------
      const refGroup = Array.from(vModelForm.querySelectorAll('.input-group'))
        .find(g => g.querySelector('input[type=checkbox]') && g.querySelector('input[type=text]'));

      if (refGroup) {
        const refCheckbox = refGroup.querySelector('input[type=checkbox]');
        const refText = refGroup.querySelector('input[type=text]');

        if (refCheckbox && refText) {
          if (documentStatusHasValue) {
            app.AutomaticReference = false;
            refCheckbox.checked = false;
            refCheckbox.style.pointerEvents = 'none';
            refCheckbox.style.opacity = '0.8';
            refText.readOnly = true;
            refText.setAttribute('readonly', 'readonly');
          } else {
            app.AutomaticReference = true;
            refCheckbox.checked = true;
            refCheckbox.style.pointerEvents = 'auto';
            refCheckbox.style.opacity = '1';
            refText.readOnly = false;
            refText.removeAttribute('readonly');
          }
        }
      }

      // ------------------------------------------------------------
      // CREATE BUTTON → Set Document Issue Date
      // (Mode Create)
      // ------------------------------------------------------------
      const createButton = document.querySelector('button.btn.btn-primary');

      if (createButton && typeof app !== 'undefined' && app?.CustomFields2?.Strings) {
        const now = new Date();
        const currentDate = now.toISOString().slice(0,19).replace('T',' ');
        const currentDateOnly = now.toISOString().slice(0,10);

        app.CustomFields2.Strings[documentIssueDateGuid] = currentDate;
        app.IssueDate = currentDateOnly;
      }

    // ------------------------------------------------------------
	// NEW FEATURE REQUESTED BY USER
	// If UpdateButton exists AND documentIssueDate empty → create new timestamp
	// ------------------------------------------------------------
	if (updateButton &&
		typeof app !== 'undefined' &&
		app?.CustomFields2?.Strings &&
		!app.CustomFields2.Strings[documentIssueDateGuid]) {

		// Use existing app.IssueDate for the date
		const issueDate = app.IssueDate; // expected format: yyyy-MM-dd

		// Current time
		const now = new Date();
		const hh = String(now.getHours()).padStart(2, '0');
		const mm = String(now.getMinutes()).padStart(2, '0');
		const ss = String(now.getSeconds()).padStart(2, '0');

		// Combine: existing date + current time
		const finalDateTime = `${issueDate} ${hh}:${mm}:${ss}`;

		// Apply
		app.CustomFields2.Strings[documentIssueDateGuid] = finalDateTime;

		// Do NOT change app.IssueDate
	}


      // ------------------------------------------------------------
      // Remove script block
      // ------------------------------------------------------------
      document.getElementById('MainScriptContainer')?.remove();

    });
  </script>
</div>

The new script should add the Document Issue Date in Edit mode after batch creation from a recurring sales invoice. Document Issue Date should be generated based on the invoice date and the time when you perform the first update.

Please make sure to back up your data before trying this and let me know if this approach works as expected.

1 Like

I’m trying to explain how Consolidated e-Invoice (Code 004) works. But I’m worried I might have made some mistakes in my explanation. Please correct me if I’m wrong about anything! :sweat_smile:


A Consolidated e-Invoice (LHDN Classification Code 004) is not a sales document. It is a regulatory summary report generated from existing transactional data already recorded in Manager. io.

Purpose: It applies to B2C or B2B sales under RM10,000 where no individual e-invoice was requested by the customer.

Submission requirement: Must be submitted to IRBM within 7 calendar days after month-end.

Important: This process does not create new sales invoices in Manager. io—it only reports existing sales to the authorities.

Current Problem

Example Scenario:

  1. We record daily sales invoice (e-invoice code 01, classification code: [Moderator: removed link for security] in Manager. io (Invoice R26/0001, R26/0002, R26/0003, R26/0004… R26/0325)

  2. When a customer requests an e-invoice (e.g., for R26/0003), we use the current MyInvois extension to issue an individual e-invoice [e-invoice code 01, classification code: depend on category of products or services (except 004)]

  3. At month-end, we must:

    • Manually calculate totals for all remaining invoices (R26/0001, R26/0002, R26/0004…R26/0325)

    • Manually create a Consolidated e-Invoice (Code 004) in the MyInvois portal

    • This is time-consuming, inefficient, and error-prone

Additional limitation: Sales Debit Notes and Refund Notes are not currently available in Manager. io


Requested Feature: “Generate Consolidated e-Invoice”
We need a new function (possibly in Advanced Queries or a dedicated button) called “Generate LHDN Consolidated e-Invoice”.

How It Should Work:

Step 1: User Input
• User selects date range (e.g., 01/01/2026 to 31/01/2026)

Step 2: System Processing (Critical Logic)
The system must:
• Locate all sales invoices within the selected period
• Automatically exclude any invoice that already submitted an individual e-invoice (e-invoice Code 01, Classification Code: xxx except 004 )
• Group remaining invoices by consecutive invoice number sequences
• Filter only invoices marked with custom field: Classification Code = “004 - Consolidated e-Invoice”

Step 3: Auto-Generate Submission Data

Important of Consolidation Rule

Regardless of whether the original invoices in Manager. io were issued to “General Public” or to specific companies, ALL Classification Code 004 invoices must be consolidated and submitted to MyInvois under standardized “General Public” buyer details.

Formula:
Sales invoices (Classification Code 004) in Manager. io: General Public (A) + Specific Companies (B) = Consolidated submission to MyInvois: (A+B) under “General Public”

The system should auto-populate the MyInvois submission form with standardized information only:

Classification Code: 004
Buyer’s Name : General Public
Buyer’s TIN : EI00000000010
Buyer’s Registration / Identification Number / Passport Number: NA
Buyer’s Address: NA
Buyer’s Contact Number : NA
Buyer’s SST Registration Number: NA
Description of Product / Services: [Details of products or services being billed for a transaction with customers]

Remark: Description of Product / Services: adopt one (or a combination)
(a)Summary of each receipt is presented as separate line items
(b)List of receipts (in a continuous receipt number) is presented as line items (i.e., where there is a break of the receipt number chain, the next chain shall be included as a new line item)

Line Item Structure:
The system creates separate line items for each consecutive block of invoices:

Example Line 1:
• Classification : 004
• Description: “R26/0001–R26/0002”
• Quantity: 1
• Unit Price: Sum of R26/0001 + R26/0002 (before tax)
• Discount: Sum of discounts from R26/0001 + R26/0002
• Tax Amount: Sum of tax from R26/0001 + R26/0002
• Total Amount (incl. tax): Sum of (Before Tax - Discount + Tax)

Example Line 2:
• Classification : 004
• Description: “R26/0004–R26/0325”
• Quantity: 1
• Unit Price: Sum of R26/0004 to R26/0325 (before tax)
• Discount: Sum of discounts from R26/0004 to R26/0325
• Tax Amount: Sum of tax from R26/0004 to R26/0325
• Total Amount (incl. tax): Sum of (Before Tax - Discount + Tax)

Step 4: Review and Submit
• User reviews the auto-generated summary
• User submits directly to LHDN for validation
• Critical: This does NOT create a new invoice in Manager. io books
• LHDN returns a validated e-Invoice number (e.g., XX-XXXXX)
• This e-Invoice number and validation status should appear in Manager. io’s sales invoice view (right column)

sample
[Moderator: removed image for security reasons as contained personal details]


The same functionality is needed for:
• Consolidated Sales Credit Notes (e-invoice Code 02 , Classification Code 004)
• Consolidated Sales Debit Notes (e-invoice Code 03, Classification Code 004)
• Consolidated Refund Notes (e-invoice Code 04, Classification Code 004)

1 Like

I haven’t seen any requirement to report consolidated eInvoices in the LHDN SDK platform so far. I’ll take another look into it later, but it would be even better if you could share a link or reference that I can study further.

1 Like

Hi,

I couldnt find the intergration wizard? despite clicked the link for the extension. However, couldnt fill up any business details & data ?

If you looking for better plugin, can consider us https://aisoftbox.com/website2025/manager_io/

Can I know about this ?

In extension setting should be place in

In those 3

1 Like

Hi there, does this extension work only with admin accounts? An account with restrictions is unable to submit e-invoices through the extension. Which access type should I enable to allow the use of this extension for e-invoicing?

Invoicing requires data on Sales, Business Details, Inventory, TaxCode, and Customer. These settings should be sufficient for a restricted user to send an invoice

1 Like

Hi there, I want to ask regarding the integration setup. I successfully completed the credential verification, but when I try to update the business data, it cannot be updated and shows failed. Could you please advise?

Provide more information about the version and edition of Manager you are using, and whether you set up the integration using an Administrator account or a restricted user.

If you are using a restricted user, make sure you have at least the permissions shown in the image from the previous post, with Create and Update permissions under Settings – Business Details.

2 Likes