OK here is an example of how our inventory is entered into Manager. I will point out that the key fields in this process is the data entered into the “Item Code” and “Item Name” fields. Why? The reason for this is that when generating Purchase order, Quote and most importantly Invoices these two fields are used as lookup for the Item you wish to order or input into an Invoice. This is different from using the search in the Inventory which carries out lookup in all fields. So if detail is not entered with careful planning you could potentially find an item easily in the inventory but not when trying to populate you Invoice or purchase order.
We have chosen to use “Item Code” field for the Barcode data as scanned by a scanner.
The “Item Name” field we use to input key information to help us lookup an inventory item. Note that the information inputted in the “Item Name” field does not appear on an Invoice which is great and thus allows us to input the supplier code if desired and not be disclosed to the customer.
The “Description” field appears on the Invoice and here you can decide how much you wish to display to your customer / Client on the Invoice.

Now when you scan the barcode on the item you want to invoice the item is found and can be quickly populated on the line. (You can set you scanner to give an “enter sequence” which will then fully populate the Invoice line in the same way should you have used your keyboard.
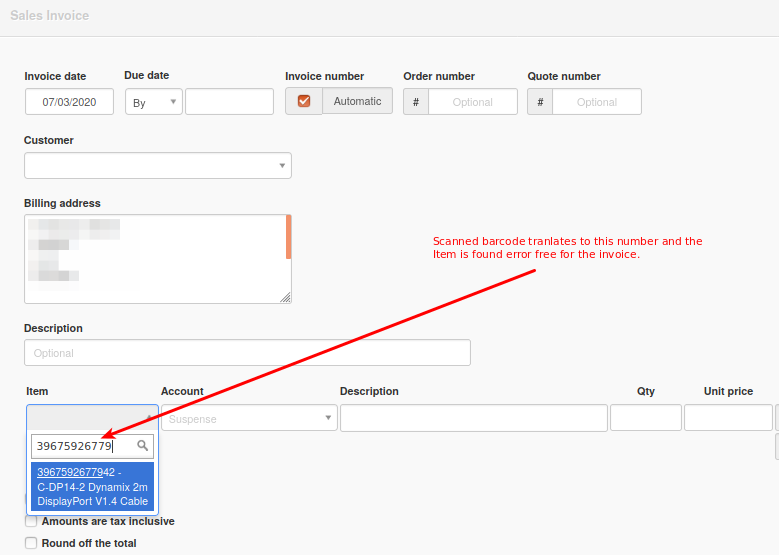
Select Item and press enter if not already configured on your scanner. All fields populate.

Create the Invoice by clicking the “Create” button and you have code and description fields presented on the Invoice. Nice and tidy and error free.

Job done…
What manager does not do is generate barcodes but there are plenty of applications that can and some may come with your barcode label printer.